
路由原理
前端路由:在单页应用里面,路由要做到的就是,改变url不刷新页面但是可以改变ui;一般有两种方式实现
hash方式
- url中的
#后的字符串称为hash,改变这一段是不会引起页面刷新的,一般用来做锚点进行页面内的导航; - 有一个事件
hashchange可以用来监听url中hash的变化;无论时浏览器的前进后退,还是<a>标签、还是location改变都会触发事件 - 结合改变hash不刷新页面,然后使用hashchange事件来监听hash改变,改变时更新组件视图即可
1 | function changeHash(num) { |
history方式
- window对象有history属性,原型是History;History拥有两个方法
pushState,replaceState可以修改url而不引起刷新【这两个方法是增加或替换历史栈中最新的栈帧】
History接口允许操作浏览器的曾经在标签页或者框架里访问的会话历史记录。
- 然后虽然也有事件
popstate可以用来监听history的栈变化,但是只对浏览器前进后退按钮和go、back函数起作用但是对<a>标签、location改变或者pushState,replaceState改变的都不会触发;即便这样,但是也还是可以通过拦截这些事件再做出更新视图操作即可
1 |
|
当然,如果不要求组件变化时连带浏览器的url变化,那么直接使用js变量模拟即可,不修改url。
vue-router源码阅读(v3.5.2)
在使用vue-router时都是首先const router = new VueRouter(routes),然后Vue.use(router),所以首先会指向VueRouter类的构造函数,然后是插件化的VueRouter的install函数
这里理解下文需要一些前置知识
- vue和vue-router的基本使用
- vue-router的路由守卫使用
- vue的函数式组件:render的触发
- vue的异步组件:拆包,ajax加载
不必很了解,但应该知道一些作用和特点
VueRouter的构造函数
源码项目中src/index.js,定义了VueRouter类
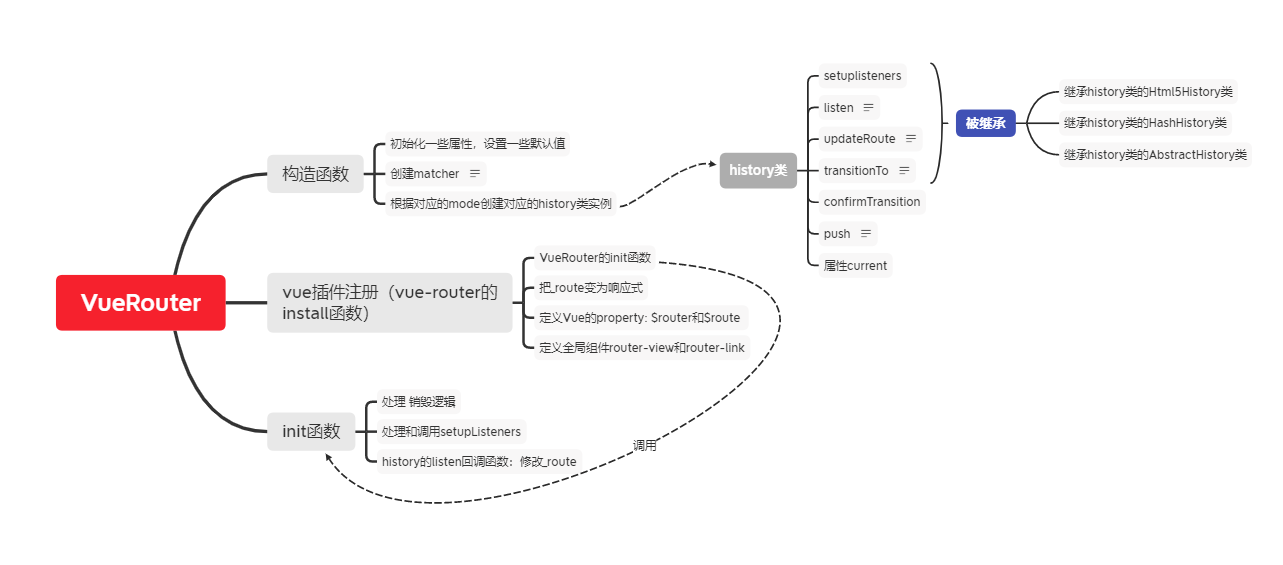
VueRouter的constructor函数,主要做了以下几件事情:
初始化一些属性,设置一些默认值
创建matcher:
this.matcher = createMatcher(options.routes || [], this)根据设置的options,得到对应的mode,然后根据mode创建对应的history实例;mode有三种情况
hash:对应前面所提到的hash路由原理history:对应前面所提到的history路由原理abstract:对应前面所提到的不修改url了,直接用变量存储路径
具体创建的History类代码在
src/history/*中
Route和RouteRecord
阅读时会发现,route路由信息是有两种类型的:Route和RouteRecord。
Route表示的是当前路由信息
RouteRecord对应routeConfig配置时的信息,一条对应一个,若在多层路由下,那么当前路由信息就匹配了多个路由记录
Route实例作为$route的值,而RouteRecord的实例则作为$route的matched属性
举个例子
路由配置:
1 | export default new VueRouter({ |
若当前url为:/demo/triangle
则结果

我们把配置时每一个对象看作一个路由。可以看出Route是包含RouteRecord的,Route代表当前的所有路由信息,路径是什么,有什么参数,匹配了那几条路由;RouteRecord相对Route来说更狭义,它才是真正代表单个路由。
不完全理解也没关系,这里可以留有概念,结合下文再进一步熟悉。碎片多了之后,拼凑起来就看到全局,自然就会理解了
创建machter
createMatcher函数逻辑:
根据传入的routes配置对象,为每个route配置(routeConfig)生成一个routeRecord,然后再生成两个map和一个数组:
- nameMap根据route的name属性可以获取对应的routeRecord;
- pathMap,和nameMap一样,根据path获取对应的routeRecord
- pathList,所有route的path构成的一个数组,同时会把“*”通配路径放到数组最后。
以上是作为一个闭包,不在matcher对象内。
定义一些函数,最后返回一个对象的方法。
也即最终的matcher是一个对象,一个只有四个方法的对象:
- match :返回匹配的route(非routeRecord)
- addRoute:增加路由配置
- getRoutes:获取所有路由记录
- addRoutes : 增加路由配置(多个)
1 |
|
可以看到的,调用了createRouteMap(routes)来生成对应nameMap、pathMap和pathList三个闭包变量。
createRouteMap函数
1 | function createRouteMap ( |
先通过addRouteRecord函数来处理routes到nameMap、pathMap和pathList,然后再处理通配符“*”优先级。
对于这个createRouteMap函数来说,主要操作都由addRouteRecord函数完成。
addRouteRecord
1 | function addRouteRecord ( |
history类
history按照mode值分为三个类,而三个类都三个类又都继承于一个父类:
父类
HistoryAbstractHistoryHashHistoryHTML5History
History类
代码在`src/history/base.js中;这里要理解一些oop编程的思想,继承和多态。子类由父类继承,子类拥有所有父类方法,所以不同history中逻辑相同的部分抽象放到了History类,比如transitionTo等函数,就做一些路由切换逻辑,路由守卫逻辑等;
不同的子类history,代表了不同的路由实现(原理)方式,比如修改路由时是修改url还是修改hash还是其他,这些更具体的,逻辑分叉。为了统一接口,所有修改路由逻辑都放在history的push方法中,也即不同的类都有push方法,但是其中逻辑不同,这体现了oop多态的。阅读源码,比了解功能更重要的应该就是学习设计思想吧。
看一下history类的核心函数:
listen和updateRoute
这两个函数互为对应,由listen接收一个回调,由updateRoute调用这个回调;类似订阅发布一样on(listen)某个回调,emit(updateRoute)触发/调用 回调函数,区别在于订阅发布一般还会多一个类型,某个类型订阅后,某个类型弹出就执行这个类型对应的回调。
history的接收回调,这个回调将在由this.updateRoute调用;
1
2
3
4
5
6
7
8
9
10class History {
listen (cb: Function) {
this.cb = cb
}
// ...
updateRoute (route: Route) {
this.current = route
this.cb && this.cb(route)
}
}由VueRouter在init函数中调用
history.listen传入回调1
2
3
4
5
6
7
8
9
10
11
12
13class VueRouter{
// ...
init () {
// ...
history.listen(route => {
this.apps.forEach(app => {
// 修改_route
app._route = route
})
})
}
//...
}updateRoute的话在下文transitionTo调用
transitionTo
精简一下大概如下
1
2
3
4
5
6
7
8
9
10
11
12
13
14
15
16
17
18
19
20
21
22
23
24
25
26
27
28
29
30
31
32
33
34
35class History {
// ...
transitionTo (location, onComplete, onAbort) {
// 获取要导航到的location的route
let route = this.router.match(location, this.current)
// 当前route(跳转前的路由)
const prev = this.current
// 调用confirmTransition,处理路由馊味逻辑
this.confirmTransition(
route,
() => {
// 这个回调在完成confirmTransition逻辑的后执行
// 这里就是执行history.listen的回调,修改了_route,最终促使视图更新
this.updateRoute(route)
// 这里再执行onCompelete, 其实就是所有transitionTo逻辑完成后调用回调
// transitionTo由history.push调用,可以在各个history子类内部push方法查看
// 其实回调内的逻辑就是修改url
// 所以正常顺序就是 $router.push()==》路由守卫逻辑==》修改视图==》修改url
onComplete && onComplete(route)
this.ensureURL()
this.router.afterHooks.forEach(hook => {
hook && hook(route, prev)
})
// ...
},
err => {/*... */}
}
)
}
// ...
}过渡,也即在路由变化时中间的逻辑,主要是路由守卫逻辑;
逻辑如下:- 首先,根据location通过match函数取得对应的routerRecord
- 根据routeRecord调用confirmTransition
- 在调用confirmTransition时,传入第二个参数作为confirmTransition逻辑完成后的回调函数;这个回调函数内调用this.upadteRoute更新_route,
_route是一个响应式数据,更新操作会触发重新渲染,而因为router-view组件是函数式组件,也会重新渲染,从而最终使得页面切换了视图组件。
所以transitionTo是一个核心函数,由它触发路由跳转逻辑中的视图更换。
confirmTransition
这里面的逻辑,不得不说,真xx的套娃,函数传来传去。。。
目前还了解不了为什么要这样做(TODO)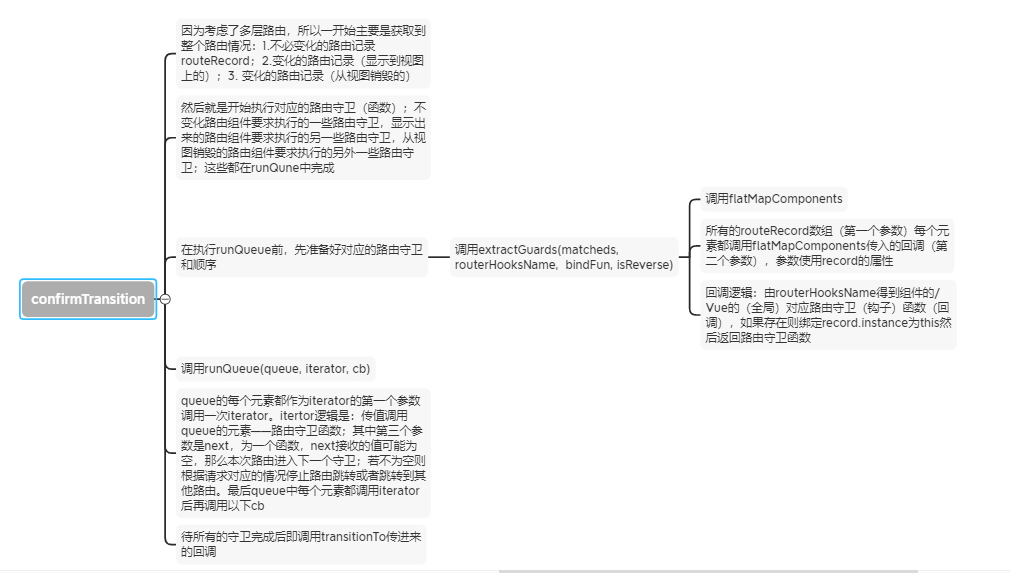
整体逻辑:
获取到整体的路由情况:因为考虑了多层路由,所以会是三种路由记录的数组,而不是单个路由记录
如
sale/product/list跳转到sale/product/detail,这里是三层路由/sale、/product、/detail和/list- 不必变化的路由,
/sale和/product - 变化的路由——显示,
/detail - 变化的路由——销毁,
/list
- 不必变化的路由,
执行路由守卫(一个函数);在具体代码因为这部分比较复杂可以再切分两部分来看:取得各种路由守卫构成一个数组、数组按序执行
具体代码:

获取三种路由记录routeRecord数组
1
2
3
4
5
6
7
8
9
10
11
12
13
14
15
16
17
18
19
20
21
22
23
24
25
26
27
28
29confirmTransition (route: Route, onComplete: Function, onAbort?: Function) {
const current = this.current
// 跳转的目的路由
this.pending = route
const abort = err => {/* ... */}
onAbort && onAbort(err)
}
const lastRouteIndex = route.matched.length - 1
const lastCurrentIndex = current.matched.length - 1
// 判断是否是同一个路由,是则直接停止路由跳转
if (
isSameRoute(route, current) &&
// in the case the route map has been dynamically appended to
lastRouteIndex === lastCurrentIndex &&
route.matched[lastRouteIndex] === current.matched[lastCurrentIndex]
) {
this.ensureURL()
return abort(createNavigationDuplicatedError(current, route))
}
// current代表了跳转前的路由(当前路由),route代表了跳转的目的路由
// 通过resolveQueue来找到分类三种路由记录数组
const { updated, deactivated, activated } = resolveQueue(
this.current.matched,
route.matched
)
// ....
}resolveQueue:很简单,看代码即可
1
2
3
4
5
6
7
8
9
10
11
12
13
14
15
16
17
18
19
20
21
22
23function resolveQueue (
current: Array<RouteRecord>,
next: Array<RouteRecord>
): {
updated: Array<RouteRecord>,
activated: Array<RouteRecord>,
deactivated: Array<RouteRecord>
} {
let i
const max = Math.max(current.length, next.length)
// 遍历,当两者某一层i不同了,就终止遍历
for (i = 0; i < max; i++) {
if (current[i] !== next[i]) {
break
}
}
// i层之前的就是相同的路由记录,不必变化,后面的就是变化的了,分别从current和route里面取,那么就是需要变化的路由记录的不同两种
return {
updated: next.slice(0, i), // 无需变化的路由记录数组
activated: next.slice(i), // 视图显示的路由记录数组
deactivated: current.slice(i) // 将被销毁的路由记录数组
}
}接下来先把各种路由守卫按序构造成数组然后数组遍历执行
各种路由守卫按序构造成数组
1
2
3
4
5
6
7
8
9
10
11
12
13
14
15
16const queue: Array<?NavigationGuard> = [].concat(
// in-component leave guards
// 获取 离开的路由守卫(从被销毁的路由记录中找到)
extractLeaveGuards(deactivated),
// global before hooks
// 全局的before hooks
this.router.beforeHooks,
// in-component update hooks
// 获取 extractUpdateHooks路由守卫(从无需变化的组件中寻找)
extractUpdateHooks(updated),
// in-config enter guards
// 进入之前的路由守卫
activated.map(m => m.beforeEnter),
// async components
resolveAsyncComponents(activated)
)这里的获取路由守卫的函数extractLeaveGuards,extractUpdateHooks其实本质上是一样的
1
2
3
4
5
6
7function extractLeaveGuards (deactivated: Array<RouteRecord>): Array<?Function> {
return extractGuards(deactivated, 'beforeRouteLeave', bindGuard, true)
}
function extractUpdateHooks (updated: Array<RouteRecord>): Array<?Function> {
return extractGuards(updated, 'beforeRouteUpdate', bindGuard)
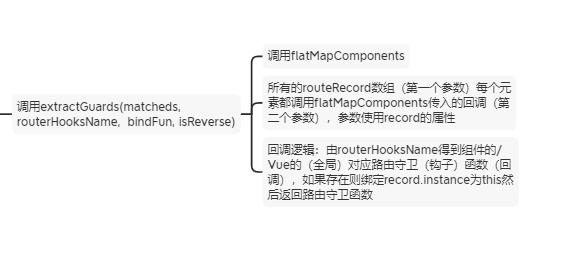
}都是通过extractGuards函数
1
2
3
4
5
6
7
8
9
10
11
12
13
14
15
16
17
18
19
20
21
22
23
24
25
26
27
28
29
30function extractGuards (
records: Array<RouteRecord>, // 从这些路有记录中提取
name: string, // 路由守卫的名字
bind: Function, // 绑定this 的函数
reverse?: boolean
): Array<?Function> {
// 这里调用了一个函数,这个函数返回最终的是绑定好对应this了的路由守卫函数数组
const guards = flatMapComponents(records, (def, instance, match, key) => {
// 这里先提取def中name名字的路由守卫
const guard = extractGuard(def, name)
if (guard) {
return Array.isArray(guard)
? guard.map(guard => bind(guard, instance, match, key))
: bind(guard, instance, match, key)
}
})
return flatten(reverse ? guards.reverse() : guards)
}
// 提取路由守卫,若本def(组件实例)没有定义对应name的路由守卫则取全局的Vue的
function extractGuard (
def: Object | Function,
key: string
): NavigationGuard | Array<NavigationGuard> {
if (typeof def !== 'function') {
// extend now so that global mixins are applied.
def = _Vue.extend(def)
}
return def.options[key]
}总结逻辑如下
接下来是执行这些路由守卫函数
最终执行路由守卫的函数runQueue(queue, fn, cb)和flatMapComponent内部逻辑类似,都是第一参数是数组,然后数组每一个元素都作为fn的参数执行一次fn,所有最终完成后执行cb。这里iterator将作为fn参数,这是一个迭代函数,在里面定义具体执行路由守卫。
在看iterator代码之前,可以先熟悉一下路由守卫的用法,然后配合理解iterator代码会好一点
1
2
3
4router.beforeEnter: (to, from, next) => {
if (to.name !== 'Login' && !isAuthenticated) next({ name: 'Login' })
else next()
}路由守卫用法基本一致,是一个接收三个参数的函数,第一个参数to是目的路由,第二参数from就是跳转前路由,最后接收一个函数next,next执行不传参则正常跳转,传对应route/字符串则会另外跳转。
再看iterator:
1
2
3
4
5
6
7
8
9
10
11
12
13
14
15
16
17
18
19
20
21
22
23
24
25
26
27
28
29
30
31
32
33
34
35
36
37
38
39
40
41
42
43//【注意!!! 这里iterator的第二参数也是命名为next,不要和上面使用例子混淆了,这里的next是由调用iteraotr传值进来的函数(由runQueue内部传值,详情看下面)
const iterator = (hook: NavigationGuard, next) => {
// 不等,则目的路由有变化,停止跳转
if (this.pending !== route) {
return abort(createNavigationCancelledError(current, route))
}
try {
// hook就是路由守卫函数,调用,传值进去,都没问题,细看下第三个参数,就是上面例子的next
hook(route, current, (to: any) => {
if (to === false) {
// 当路由守卫函数第三参数调用传值false进来时停止跳转
// next(false) -> abort navigation, ensure current URL
this.ensureURL(true)
abort(createNavigationAbortedError(current, route))
} else if (isError(to)) {
// 当出错时,停止跳转
this.ensureURL(true)
abort(to)
} else if (
typeof to === 'string' ||
(typeof to === 'object' &&
(typeof to.path === 'string' || typeof to.name === 'string'))
) {
// 当传了一个字符或者对象带path/name字符串属性时,那么跳转到这个对应的路由
// next('/') or next({ path: '/' }) -> redirect
abort(createNavigationRedirectedError(current, route))
if (typeof to === 'object' && to.replace) {
this.replace(to)
} else {
this.push(to)
}
} else {
// next的逻辑是跳转到下一个路由守卫,
// confirm transition and pass on the value
next(to)
}
})
} catch (e) {
abort(e)
}
}当iterator被调用时,就调用作为参数传进来的路由守卫函数(绑定了this,上文有提),然后根据路由守卫内部情况决定继续下一个路由守卫还是改变跳转目标路由还是停止跳转等。
最后的runQueue:
1
2
3
4
5
6
7
8
9
10
11
12
13
14
15
16
17
18
19
20export function runQueue (queue: Array<?NavigationGuard>, fn: Function, cb: Function) {
const step = index => {
if (index >= queue.length) {
cb()
} else {
if (queue[index]) {
// 注意这个地方,fn即confirmTransition的iterator,
// 那么iterator的第二参数next其实就的这里的箭头函数,next是不改变跳转方向的,
// 也不接受值,触发下一步循环
fn(queue[index], () => {
step(index + 1)
})
} else {
step(index + 1)
}
}
}
step(0)
}逻辑也不复杂,就是queue按序从前往后每一个元素调用以下fn,都完成后再调用一下cb;
疑问:为什么不直接执行,都是同步代码,非要再弄一个runQueue?因为runQueue通过step能把是否执行下一步交由外部决定(iterator中是否是继续路由守卫还是停下路由);既然如此,直接使用for-break也行吧?runQueue可以使得异步代码也按序执行。那直接使用async/await不就好了,反正也用ES6语法
而在confirmTransition使用runQueue
1
2
3
4
5
6
7
8
9
10
11
12
13
14
15
16
17
18
19
runQueue(queue, iterator, () => {
// wait until async components are resolved before
// extracting in-component enter guards
const enterGuards = extractEnterGuards(activated)
const queue = enterGuards.concat(this.router.resolveHooks)
runQueue(queue, iterator, () => {
if (this.pending !== route) {
return abort(createNavigationCancelledError(current, route))
}
this.pending = null
onComplete(route)
if (this.router.app) {
this.router.app.$nextTick(() => {
handleRouteEntered(route)
})
}
})
})
这里有两轮runQueue,第一轮runQueue完成后调用cb,cb中又有一轮runQueue中间分叉的是因为async组件。下面是一些接口,具体实现由子类实现
- setupListeners:安装监听器,比如hash模式需要监听url变化的hashchange事件,销毁时要移除监听等逻辑
- push:路由跳转逻辑,实现url变化和视图变化
- replace:同样是跳转,和push不同的是不记录history,即后退不会回到之前页面
- go:接受一个数字n然后跳转帧历史记录,正数往后,负数往前
- ensureURL:单纯的更新url,不会导致页面视图的变化(push会有视图更新的逻辑)
- getCurrentLocation:获取当前的路由(只有路由)
下面介绍三个子类只了解部分
AbstractHistory类
没有setupListeners函数,因为都没有上面监听事件的
push函数
1
2
3
4
5
6
7
8
9
10
11push (location: RawLocation, onComplete?: Function, onAbort?: Function) {
this.transitionTo(
location,
route => {
this.stack = this.stack.slice(0, this.index + 1).concat(route)
this.index++
onComplete && onComplete(route)
},
onAbort
)
}很显然,调用transitionTo,触发路由守卫,修改当前路由,修改模拟的history栈stack等
HashHistory类
setupListeners函数
1
2
3
4
5
6
7
8
9
10
11
12
13
14
15
16
17
18
19
20
21
22
23
24
25
26
27
28
29
30
31
32
33
34
35
36
37
38
39setupListeners () {
if (this.listeners.length > 0) {
return
}
const router = this.router
const expectScroll = router.options.scrollBehavior
const supportsScroll = supportsPushState && expectScroll
if (supportsScroll) {
// this.listeners将会在history.teardown调用,一般做清理工作
this.listeners.push(setupScroll())
}
const handleRoutingEvent = () => {
const current = this.current
if (!ensureSlash()) {
return
}
this.transitionTo(getHash(), route => {
if (supportsScroll) {
handleScroll(this.router, route, current, true)
}
if (!supportsPushState) {
replaceHash(route.fullPath)
}
})
}
// 监听页面的hash变化
const eventType = supportsPushState ? 'popstate' : 'hashchange'
window.addEventListener(
eventType,
handleRoutingEvent
)
this.listeners.push(() => {
window.removeEventListener(eventType, handleRoutingEvent)
})
}
push函数
1
2
3
4
5
6
7
8
9
10
11
12
13
14
15push (location: RawLocation, onComplete?: Function, onAbort?: Function) {
const { current: fromRoute } = this
// 开始路由守卫逻辑,更新视图逻辑
this.transitionTo(
location,
route => {
// 最后更新url
pushHash(route.fullPath)
handleScroll(this.router, route, fromRoute, false)
onComplete && onComplete(route)
},
onAbort
)
}
同样的,push作为跳转路由函数,那么就要修改视图(调用transitionTo)和修改url的hash(transitionTo后的回调onComplete中调用pushHash())
HTML5History类
setupListeners函数
1
2
3
4
5
6
7
8
9
10
11
12
13
14
15
16
17
18
19
20
21
22
23
24
25
26
27
28
29
30
31
32
33
34
35
36
setupListeners () {
if (this.listeners.length > 0) {
return
}
const router = this.router
const expectScroll = router.options.scrollBehavior
const supportsScroll = supportsPushState && expectScroll
if (supportsScroll) {
this.listeners.push(setupScroll())
}
const handleRoutingEvent = () => {
const current = this.current
// Avoiding first `popstate` event dispatched in some browsers but first
// history route not updated since async guard at the same time.
const location = getLocation(this.base)
if (this.current === START && location === this._startLocation) {
return
}
this.transitionTo(location, route => {
if (supportsScroll) {
handleScroll(router, route, current, true)
}
})
}
window.addEventListener('popstate', handleRoutingEvent)
this.listeners.push(() => {
window.removeEventListener('popstate', handleRoutingEvent)
})
}
和hash的基本一样
push函数
1
2
3
4
5
6
7
8push (location: RawLocation, onComplete?: Function, onAbort?: Function) {
const { current: fromRoute } = this
this.transitionTo(location, route => {
pushState(cleanPath(this.base + route.fullPath))
handleScroll(this.router, route, fromRoute, false)
onComplete && onComplete(route)
}, onAbort)
}也基本和hash一样,只是调用的函数不同
VueRouter的install函数
vue-router是作为一个vue插件使用的。vue插件都会提供install函数,做一些相应的注册操作;代码在src/install.js中。
可以看到install中做了几件事:
在Vue的beforeCreate中执行VueRouter的
init函数1
2
3
4
5
6
7
8
9
10
11
12Vue.mixin({
beforeCreate () {
if (isDef(this.$options.router)) {
this._routerRoot = this
this._router = this.$options.router
this._router.init(this)
// ...
},
destroyed () {
registerInstance(this)
}
})
把this._router变为了响应式数据
1
2
3
4
5
6
7
8
9Vue.mixin({
beforeCreate () {
if (isDef(this.$options.router)) {
// ...
this._router = this.$options.router
this._router.init(this)
Vue.util.defineReactive(this, '_route', this._router.history.current)
// ...
})把_route变为响应数据后,每当_route改变后,都会触发更新视图,而router-view组件作为一个函数式组件,关联了_router后就会随之触发其render函数,而在render函数就是做切换 显示组件 逻辑。最终达到,修改路由视图随之改变的效果
切换路由==》_router修改==》触发router-view组件的render函数==》显示组件切换==》视图更新
定义Vue的
$router和$route属性1
2
3
4
5
6
7Object.defineProperty(Vue.prototype, '$router', {
get () { return this._routerRoot._router }
})
Object.defineProperty(Vue.prototype, '$route', {
get () { return this._routerRoot._route }
})
定义好Vue的
router-view组件和router-link组件;具体代码在src/components/*1
2Vue.component('RouterView', View)
Vue.component('RouterLink', Link)
VueRouter的init函数
- this.history的setuplisteners
- 给this.history增加一个事件监听,每当路由更新时就调用
1 |
|
总结
其实在源码部分开始的图已经是总结,现在用文字概括下
- 首先,理解了路由原理
- 然后,是以vue-router的源码解读,加深理解;源码的阅读采用了时间顺序,即从使用vue-router的角度,开始做了什么?然后又做了什么? 一步一步去理解
- vue-router首先是一个类,所以第一步是先执行了VueRouter类的构造函数
- 接受路由配置,构造路由跳转的信息数据
- 根据mode创建对应的history类
- 理解history类的transitionTo和confirmTransition函数(路由跳转,路由守卫逻辑)
- 理解push函数。
- 理解不同mode方式之间,具体路由的关注点/触发点
- 第二步是插件注册的逻辑,即install函数
- 在Vue的beforeCreate中执行VueRouter的
init函数 - 把this._router变为了响应式数据
- 定义Vue的
$router和$route属性 - 定义好Vue的
router-view组件和router-link组件;具体代码在src/components/*
- 在Vue的beforeCreate中执行VueRouter的
- 第三步是install里面执行的VueRouter.init方法。
- this.history的setuplisteners
- 给this.history增加一个事件监听,每当路由更新时就调用